Almost every year, for the past ten years, I’ve been making felt Christmas ornaments. I get this itch about mid-November to cozy up on the couch and work with my hands. I’ve made felt cottages, Christmas trees, cups of coffee, baubles and amanita mushrooms. I’ve even made the odd avocado. I keep some, give some away to friends and I’ve even swapped some for houseplants. Most of the time, I have more ideas than time to execute them.
Last year, I crafted my own monstera Christmas tree ornament, which proved to be very popular with everyone who got one. I figured other plant lovers might enjoy making it, so I put together some instructions.
I’m the first to admit that although I dabble in all sorts of crafts, I am not very good at writing instructions. So if you think there could have been a better way to explain this pattern, I’m all ears (use the contact form on the site, please).
How to make a DIY felt monstera ornament
Time it takes to make: about 2 hours.
Skill level: Beginner
What you’ll need:
Wool felt in two shades of green (a lighter shade and a darker shade).
Wool stuffing. You could also use polyfill, or whatever type of stuffing you have around the house.
Embroidery floss. We’ll use this for the vine in the middle of the leaf. You can pick a complementary or a contrasting color. I chose to stick to the same color, but a different shade of green.
String, ribbon or embroidery floss – as long as you need to make the loop that will be used to hang the monstera ornament on your Christmas tree.
Monstera ornament pattern (see step 1 below).
Scissors large enough to cut through felt.
Thread and needle.
Step 1: Get the pattern.
I don’t know about you, but every time a pattern starts with printing something, I want to scream just a little bit. I haven’t owned a printer in six years, and by the time I get to a public printer at the library, I’ll forget all about it.
Here’s my solution. Download the photo below (or even zoom in on the page, without downloading), get a white piece of paper, place it on the screen, turn your screen brightness all the way up, then trace the contour of the leaf onto your piece of paper. (Very careful not to smudge your screen, ok?)
Then cut along the contour you’ve traced until you’re left with a monstera leaf.
Did it work?

Step 2: Cut the felt.
Trace the pattern onto your coloured felt sheets using a fabric pencil or a pen. If you’re confident in your dexterity, you can simply pin the pattern to the felt and cut around the pattern without tracing. Cut two felt leaves for every ornament you’re making (one for each side of the leaf).

Step 3 : Improvise (or not).
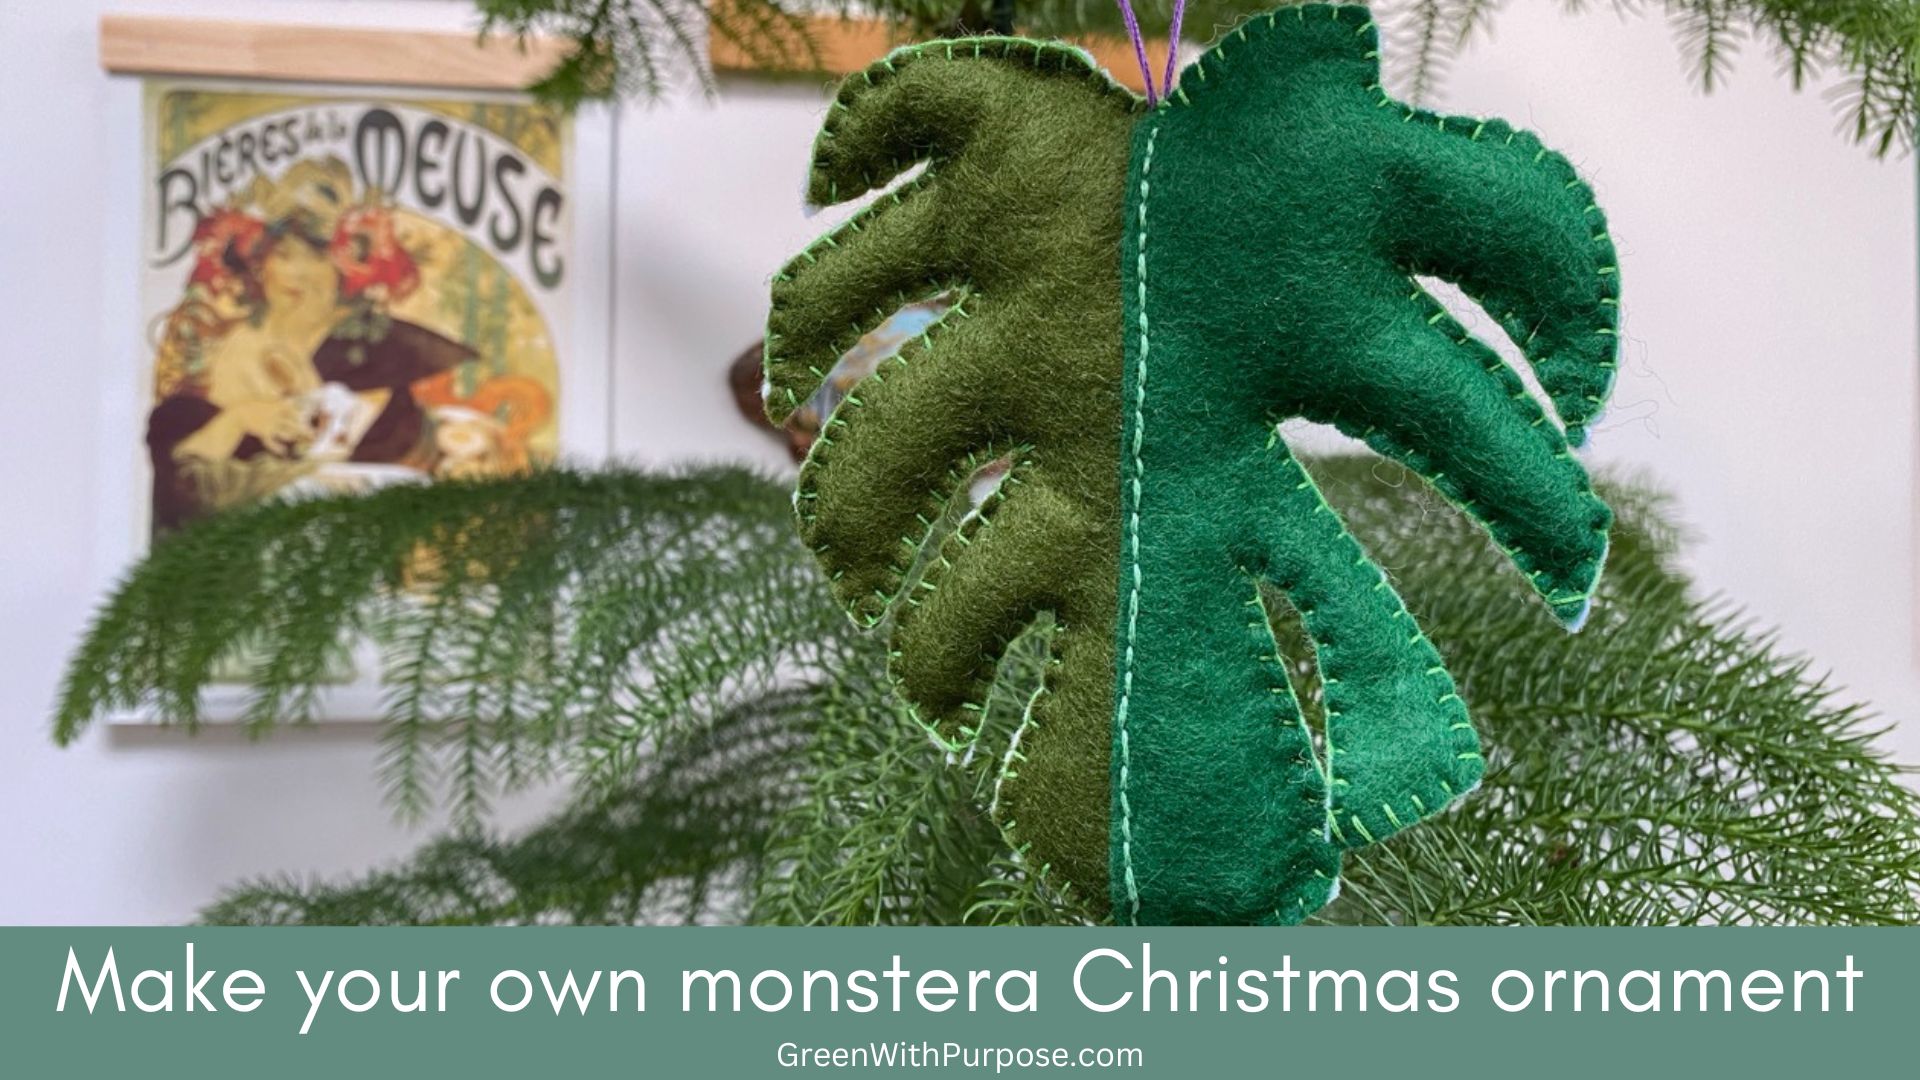
This is where you can really get creative, if you want to. You can fold the monstera printout in half, then trace it on a different shade of green felt. Then sew it on top of the full-sized leaf. This will give you the half-and-half look below.
If you want your monstera leaf to be just one shade of green, but still want to add some zing to it, stitch a straight line along the leaf from the top to the bottom to represent the middle vine. I played around with making a few more lateral vines, but in the end that looked too busy for my taste.

Step 4: Stitch around it.
Use a matching or contrasting thread to sew the edges of the leaves together almost all the way around using a blanket stitch. I usually start from top right, along the right side, and close on the left. I’m right-handed, so that’s the easiest way for me. It’s really just a matter of personal preference.
In the photos below, I used a contrasting thread color to clearly show the stitches, but you can also use thread that matches the leaves. If in doubt, you can use black thread (for some reason, I always gravitate toward black thread).
Step 5: Add the filling.
When you have about four inches left open, that’s when you can add the stuffing. I used a bamboo knitting needle to fill in the sides of the leaf. Don’t worry about getting it perfect, as long as you manage to give it some volume.
When you get to the top of the leaf, attach a loop of twine or ribbon to hang the ornament.
Then finish stitching the ornament closed.
Copyright stuff: You’re more than welcome to use this free project and tutorial for personal use. Contact me for commercial use and Etsy sales.

Some of the links in this post are affiliate links. This means that if you make a purchase through one of the affiliate links, I will get a very small commission or referral fee at no additional cost to you. You can read more on my affiliate policy page.
If you want to read more about plants and gardening, I invite you to join my free Substack mailing list. There’s no endless salesy email sequence here. Just humans chatting about slow gardening, books and seasonal living.
And in the spirit of Christmas preparations, here are a few other articles you might find interesting. Just click on the images to open the posts.


